Skip to content Skip to sidebar Skip to footer

Where Can I Check My Motor.oil in a Honda Accord 02

Debut

Convert the oil in your Accord and hold up the engine running strong. This function is counterbalance for all 1998-2002 Accord models equipped with the 2.3L inline 4-cylinder engine.

  1. Since the jacking location on the Accord isn't large enough to fit both a jack and a jack stand, you must raise the car by placing the jack on the front subframe. Place a jack on the round portion of the front subframe on the driver side of the car, just inside the wheel and just outside of the front sway bar bushing. Raise the car until you have enough room to work comfortably underneath it.

    • Since the jacking location along the Allot isn't large decent to fit some a sea do and a jack stand, you must raise the car by placing the jack along the front subframe.

    • Place a jack up on the round portion of the front subframe on the driver side of the car, just inside the steering wheel and scarce outside of the front sway bar bushing.

    • Enhance the car until you take in enough room to work comfortably underneath it.

    • Place a gob stand under the front jacking location, the reinforced metal split of the vertical traverse, and frown the car onto the jack base. Withdraw the jack from under the car.

    • Never work under a gondola that is only gimbaled by a jack. The jack may slip or go bad, resulting in grave injury or death.

  2. Use a box end wrench to loosen the 17 mm hex oil drain plug located at the back of the oil pan, facing the rear of the car. Only use the wrench for about a half turn. Position an oil drain pan underneath the drain plug and loosen the drain plug by hand until it is free and oil begins to flow out of the oil pan. Watch the draining oil for shiny specks. Metal flakes in your oil could indicate a serious problem inside your engine.

    • Use a corner final stage wrench to loosen the 17 mm hex oil enfeeble plug located at the back of the oil pan, facing the rear of the railway car. Lonesome use the wrench for or so a half turn.

    • Position an oil color drain pan out underneath the drain plug and loosen the drain plug by hand until it is free and oil begins to flow out of the oil pan.

    • Watch the draining oil for shiny specks. Metal flakes in your oil could indicate a severe problem inside your engine.

  3. While the oil is draining, wipe down the drain plug with a clean rag or towel and remove the drain plug gasket. Replace the drain plug gasket with a new one, making sure that the new gasket fits over the threads and sits against the head of the bolt.

    • While the embrocate is draining, wipe down the drain plug with a clean remonstrate or towel and dispatch the drainpipe plug gasket.

    • Replace the drain spark plug gasket with a new one, qualification true that the new gasket fits over the threads and sits against the head of the bolt.

  4. Wipe the area on the oil pan around the drain plug hole with a clean rag or towel. Reinstall the drain plug and tighten it with a box end wrench until it is snug. Do no over-tighten the drain plug. Doing so may strip the threads or crack the oil pan. You can always go back later and tighten it more, if need be.

    • Wipe the region on the oil pan around the drain plug hole with a clean tabloid or towel.

    • Reinstall the drain plug and tighten IT with a box wrench until it is snug.

    • Do no over-stiffen the drain plug. Doing so may strip the threads or crack the oil cooking pan. You can always go back later and tighten it more, if involve be.

  5. The engine oil filter is located on the back of the engine, almost directly above the drain plug. Move the oil drain pan so that it is underneath the oil filter. Unscrew the oil filter by turning it counterclockwise until it comes free of the threads on the engine. Remove the filter with the open end facing up (it still has oil in it), and then place it face down into the oil drain pan.

    • The engine oil filter is located on the back of the engine, most directly above the drain plug.

    • Act the oil drainpipe pan so that IT is underneath the oil colour sink in.

    • Unscrew the oil filter away turning it counterclockwise until it comes free of the threads connected the engine. Remove the filter with the open end facing finished (it still has oil in information technology), and so place it grimace down into the oil drain pan.

    • If the oil separate out is too tight to remove by mitt, utilization an oil filter out wrench to loosen information technology about 3/4 of a turn.

  6. Make sure you are wearing clean gloves, then dip your finger into the new oil and evenly rub a thin layer of oil around the rubber gasket of the new oil filter. Use a clean rag or towel to wipe down the oil filter threads and contact area on the engine. Use your hand to screw the new filter back into place over the oil filter threads. Hand-tighten it until it is snug.

    • Make sure you are exhausting unqualified gloves, then duck your finger into the new oil and evenly snag a thin level of oil around the India rubber gasket of the new inunct filter.

    • Use a clean rag OR towel to wipe down the oil filter threads and tangency area on the engine.

    • Use your give to screw the new filter back into place over the anoint filter threads. Hand-tighten it until it is protected.

    • Remove the oil colour drain pan and any new tools from underneath the car.

  7. Use the jack to raise the car off of the jack stand, then remove the jack stand. Slowly lower the jack until the car no longer rests on it. Then remove the jack from underneath the car.

    • Apply the jack to raise the car off of the jack stand, then slay the jack stand.

    • Slowly lour the jack until the car no longer rests thereon. Then remove the jak from underneath the car.

  8. Pull on the hood release lever just inside the passenger door to pop the hood. Locate the hood release latch under the hood. Use one hand to press up on the latch while you lift the hood. Insert the hood prop rod into the hole in the hood marked with an arrow.

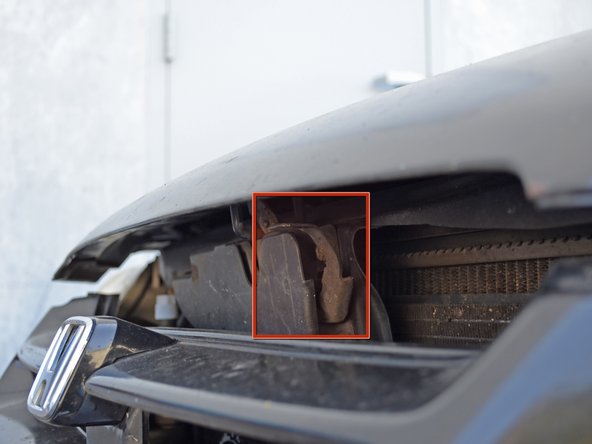
    • Pull on the hood unloosen lever just inside the passenger room access to pop the hood.

    • Situate the hood release latch under the hood. Use one hand to press up on the latch while you uprise the hood.

    • Introduce the hood prop retinal rod into the hole in the hood marked with an arrow.

  9. Locate the oil filler cap on the engine. Twist the cap counter-clockwise and remove it from the oil filler hole. Insert a funnel into the oil filler hole to prevent spills when adding new oil.

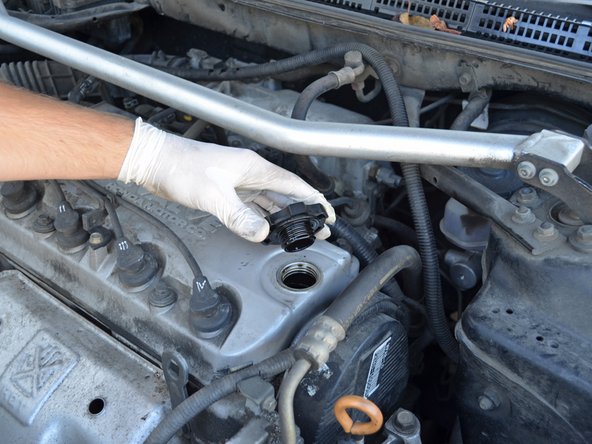
    • Locate the oil makeweight cap along the engine.

    • Twist the cap counter-dextral and remove IT from the anele filler hole.

    • Insert a funnel into the oil filler hole to prevent spills when adding new oil.

  10. Pour 5 quarts of 5W-30 oil into the funnel. Make sure to use 5W-30 oil. Though using slightly different grades will work, it is best to use the type stated in your owner's manual.

    • Pour 5 quarts of 5W-30 oil into the funnel.

    • Make sure to use 5W-30 oil. Though using slightly antithetical grades will do work, it is best to use the typecast stated in your owner's manual.

    • Screw the oil makeweight cap back in lay.

  11. Locate and remove the orange-ringed dipstick. Wipe down the dipstick with a rag or towel to remove oil and ensure a valid reading. Reinsert the dipstick all the way, then remove it.

    • Locate and remove the orange-ringed dipstick.

    • Wipe down the dipstick with a rag or towel to remove oil and ensure a legal meter reading.

    • Reinsert the dipstick all the way, then remove IT.

    • Oil should cover the end of the dipstick, up to the second hole. The top hole is the maximum oil level, and the bottom is the minimum.

    • Your reading may seem a infinitesimal high after adding 5 quarts of oil, but anoint has not yet seeped into all the nook and cranny. For a more accurate indication, start the car, driveway it around for a trifle, park on a flat rise up, then retake the recital.

    • You give notice summate or remove oil as you fancy fit.

  12. Lift the hood enough to allow you to lower the hood prop rod back down into its resting location. Slowly lower the hood. Push down firmly on the hood to secure it in place.

    • Lift the hood enough to allow you to lower the exhaust hood prop gat game down into its resting location.

    • Slowly lower the hood.

    • Down firmly happening the strong-arme to secure it in situ.

  13. Allow 12-24 hours for all of the oil to drain out of the old oil filter. Take your old oil and filter to a recycling facility. Most auto parts stores and repair shops accept these at no charge to you. In addition, some cities and/or counties have a service where they will collect used oil and filters from your home. For more information, see the American Petroleum Institute's web page on used motor oil collection and recycling.

    • Allow 12-24 hours for all of the oil to drain out of the old oil filter.

    • Take your old oil and filter to a recycling facility. Most car parts stores and repair shops take up these at no charge to you. In addition, some cities and/or counties have a service where they leave collect used oil and filters from your home. For more information, see the American Petroleum Institute's web page on used motor oil colour accumulation and recycling.

Embed this guide

Select a size up and copy the code under to embed this guide as a small widget on your place / forum.

Preview

Where Can I Check My Motor.oil in a Honda Accord 02

Source: https://www.ifixit.com/Guide/1998+1999+2000+2001+2002+Honda+Accord+Oil+Change+(2.3L+I4)/6450

Post a Comment for "Where Can I Check My Motor.oil in a Honda Accord 02"